How a Commercial Lightning Protection Design Comes Together, Step by Step
By Site Safe Lightning Protection 7 min read
A lightning protection design is a set of drawings and a material list that show where every air terminal, conductor, bond and ground electrode goes on one specific building, laid out to a recognized standard (in the US, almost always NFPA 780). The process runs in a fairly fixed order: survey, risk decision, zones of protection, drawings, installation, and third-party inspection. Owners who know that order get better bids and fewer change orders.
This article follows that sequence from the owner’s side of the table. It also covers the one design shortcut you should turn down: early streamer emission devices.
Step 1: The site survey
Design starts on the roof, not on a screen. A designer walks the building and records what drives the layout:
- Roof shape and pitch, ridge lengths, parapets, and every change in roof level.
- Everything that sticks up: rooftop units, vents, stacks, antennas, flagpoles, skylights, screens.
- Building height. NFPA 780 uses 75 ft as the line between Class I materials (structures up to 75 ft) and the heavier Class II materials (taller structures), per Section 4.1.1.
- Roofing and wall materials. Copper components can’t go on or against aluminum surfaces, and aluminum can’t go on copper or where copper runoff reaches it (Sections 4.2.3 and 4.2.4). Aluminum also can’t be embedded in concrete or masonry or used where it stays wet (Section 4.3.3).
- Where utilities enter: electrical service, telecom, gas and water. These are bonding and surge-protection points.
- Soil and ground access around the footprint, since that’s where the grounding electrodes go.
On a new building, much of this comes off the architectural set. On an existing building, a good designer still goes up and looks, because drawings rarely show the conduit someone added in 2009.
Step 2: Do you need it, and how much?
Some owners already know: the insurer requires it, the federal or campus specification calls for it, or the building stores something that can’t burn. Others need a reasoned answer.
NFPA 780 Annex L (Lightning Risk Assessment) gives that reasoning. The 2011 edition rewrote it to include both a simplified quick-look method and a detailed method. The inputs are things like local flash density, the size and setting of the building, what it’s made of, what’s inside, who occupies it, and the consequences of a strike. The output tells you whether protection is recommended. It doesn’t change how a system is designed once you decide to build one.
Cost belongs in this conversation. The Lightning Protection Institute’s FAQ says systems generally run less than 1% of a structure’s value, varying with size, location, construction, roof type and grounding conditions. Our article on the cost of lightning damage vs. installing protection covers the other side of that ledger.
Step 3: Laying out zones of protection
This is the core of the design: deciding where strike termination devices go so that the whole building sits inside a zone of protection. NFPA 780 Section 4.7.1 allows three methods, alone or combined:
- Air terminal placement rules (NFPA 780, 2023): spacing along ridges and roof edges, extra terminals in the field of large flat roofs, and terminals on chimneys, dormers and rooftop objects.
- The angle method (Section 4.7.2): for multi-level roofs up to 50 ft, a higher roof protects a lower one within a cone. Structures up to 25 ft protect a one-to-two zone; structures up to 50 ft protect a one-to-one zone.
- The rolling sphere method (Section 4.7.3): imagine a sphere with a radius equal to the striking distance, no more than 150 ft, rolled over and around the building. Anywhere the sphere touches needs protection.
A few placement rules show up on nearly every commercial roof:
| Rule (NFPA 780, 2023) | What it means on the roof |
|---|---|
| NFPA 780 (2023) | Air terminal tips sit at least 10 in. above the object they protect |
| 4.5.2.2.2 | Terminals taller than 24 in. need support at no less than half their height |
| NFPA 780 (2023) | Terminals along ridges and edges at no more than 20 ft apart, or 25 ft if they’re 24 in. or taller |
| NFPA 780 (2023) | Flat or gently sloping roofs over 50 ft wide or long get added terminals in the field at no more than 50 ft intervals |
| NFPA 780 (2023) | Pitched roofs with eaves at or below 50 ft don’t need perimeter terminals at the eaves |
Then come the conductors that tie terminals together and carry current down, the grounding electrodes at the base of each down conductor, bonding to grounded systems inside the building (common bonding of grounded systems, NFPA 780, 2023), and surge protection at service entrances (NFPA 780, 2023). The LPI overview describes these as five parts of one system: strike termination, conductors, grounding, bonding and surge protection. A design missing any of them is incomplete.
Step 4: Drawings and bill of materials
What you should receive before anyone mounts a ladder:
- Plan drawings showing every air terminal, conductor run, down conductor, bond and ground electrode, with the method used to set the zones of protection.
- Details for roof penetrations, parapet attachments, concealed runs and connections to dissimilar metals (bimetallic fittings where aluminum meets copper, per Section 4.3.4).
- A bill of materials with component classes and listings.
- The standard and edition the design follows, and the certification you’ll receive at the end.
If the building is going up now, this is the moment to coordinate with the roofer, the electrician and the concrete crew. Concealed conductors (NFPA 780, 2023) and grounding electrodes are far cheaper to install before walls close and slabs are poured.
Step 5: Installation and inspection
Installation follows the drawings, with the roofing manufacturer’s attachment requirements respected so the roof warranty survives. Ground work gets documented before backfill.
At the end, a third party should inspect. NFPA 780 (2023) provides for on-site inspection by a qualified, impartial organization where the authority having jurisdiction requires it, and the common programs are UL’s Master Label certificate and LPI’s inspection program (LPI-IP). Section 1.6 says the owner should receive recommended maintenance guidelines when the installation is done. Plan for periodic inspections afterward. Our article on inspections for industrial facilities covers why that matters.
Why to avoid early streamer emission (ESE) designs
Sooner or later someone will offer you a single “advanced” air terminal that claims to protect an entire building from one mast. These are usually early streamer emission (ESE) devices, sometimes sold alongside “charge dissipation” systems that claim to prevent strikes altogether.
The history is worth knowing. ESE makers proposed a separate standard, NFPA 781. In 1995 the NFPA Standards Council deferred it pending an independent review. That review, a literature review and technical analysis issued by the National Institute of Standards and Technology in 2000, said the precise amount by which an ESE terminal improves on a conventional one remained questionable. The Council then concluded that a sound technical basis for the proposed standard had not been demonstrated, and NFPA 781 did not go forward.
The current NFPA 780 is explicit: the 2023 edition says the standard doesn’t cover installation requirements for early streamer emission systems or charge dissipation systems. ECLE’s rolling sphere page warns that claims of a single terminal protecting a whole building, regardless of its shape, are not substantiated.
So if a proposal uses ESE terminals, ask which standard it complies with. If the answer isn’t NFPA 780, UL 96A or LPI 175, the design won’t qualify for a UL Master Label or LPI-IP certificate built on those standards, and your insurer or specifier may not accept it.
A realistic timeline
On an existing commercial building with clear roof access, the survey and design usually take less time than scheduling the crew. On new construction, the design should be done before the roofing submittals, so attachment details can be approved with the roof system. Either way, budget time at the end for the third-party inspection and any corrections it turns up.
Get a design that matches your building
Site Safe Lightning Protection designs and installs systems for commercial buildings, industrial sites and oil and gas facilities. If you’re planning a project or questioning a proposal you’ve already received, contact Site Safe Lightning Protection and we’ll walk through the layout with you.
Talk to Site Safe Lightning Protection about your property.
Frequently asked questions
How do you design a lightning protection system?
Survey the building, decide whether protection is needed (NFPA 780 Annex L helps), lay out zones of protection with air terminal placement rules, the angle method or the rolling sphere method, then produce drawings and a material list for terminals, conductors, bonding, grounding and surge protection. A third party inspects the finished installation.
What are the five elements of a lightning protection system?
Strike termination devices, conductors, grounding electrodes, bonding, and surge protection devices, as described by the Lightning Protection Institute.
What standard is used for lightning protection design in the US?
NFPA 780, Standard for the Installation of Lightning Protection Systems. UL 96A provides an inspection-oriented format based on it, and LPI 175 is the Lightning Protection Institute's standard of practice.
Are early streamer emission (ESE) lightning rods allowed?
NFPA 780 (2023) excludes ESE and charge dissipation systems from its scope, and the NFPA Standards Council declined to adopt a separate ESE standard (NFPA 781). Check what your specification, insurer and local building department will accept.
Does every building need a lightning protection design?
No. Some are required by specification or insurer, and others are a risk decision. NFPA 780 Annex L provides a structured risk assessment to support that decision.
Sources
- Lightning Protection Institute: Lightning Protection Overview
- Lightning Protection Institute: FAQ
- NFPA 780, Standard for the Installation of Lightning Protection Systems, 2023 edition (NFPA document page, free read-only access)
- EC&M: Council nixes NFPA 781
- East Coast Lightning Equipment: Rolling Sphere Method
- East Coast Lightning Equipment: Lightning Protection System Elements
Image credits
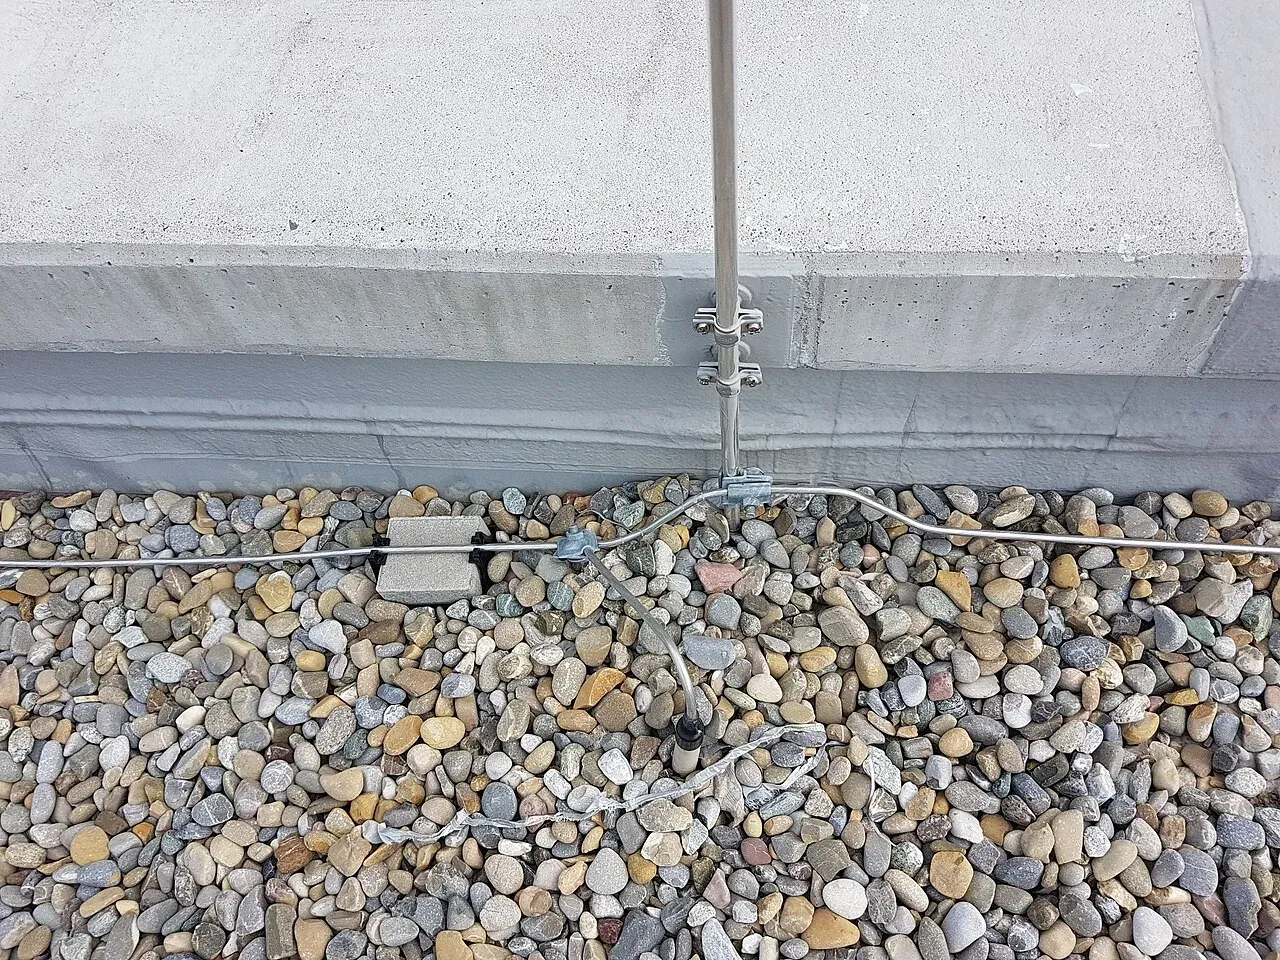
- Air terminal on a parapet connected to a roof conductor on a gravel-ballasted flat roof, part of a commercial lightning protection design. Photo: Asurnipal / Wikimedia Commons (source), CC BY-SA 4.0, resized.